USTRASANA: CAMEL POSE
The traditional variation of camel pose is not one that I personally practice. This is because the traditional variation of this backbend encourages practitioners to lean back, drop the crown of the head and take the gaze backward. This can put stress on the cervical spine and cause pinching in some practitioners.
There are very important arteries in the cervical spine that carry blood flow to the brain. When these arteries get pinched, that blood flow can become decreased. Since I have POTS, my body already struggles to get blood flow to my brain. When I practice camel pose, this becomes even harder, so I start to see spots and feel dizzy. This is definitely not what I’m looking for in my yoga practice!
If you have any kind of neck injury or if you have POTS like me, I would recommend practicing a modified variation of this pose. A simple fix for this is to simply lift the gaze and lessen the bend in the cervical spine. Further modification with props will not only make the pose more doable, but can make it feel absolutely liberating.
Our goal in practicing this pose is to create more space in the chest so that our breath can flow freely through the body. This can be accomplished in any of these variations.
Make sure that you warm up with some cat/cow stretches and cobra pose before you practice camel pose. If you’re feeling up to the traditional variation, by all means, go for it! Listen to your body and do what feels right for you.
After you practice, balance your spine with a forward fold and a twist of your choice.
BENEFITS OF CAMEL POSE:
stretches the front body - chest, abdominals, psoas and quads
strengthens the legs
opens the chest and ribcage
stretches the shoulders
benefits the heart chakra
FOR CLASSES WITH THIS POSE CLICK HERE.
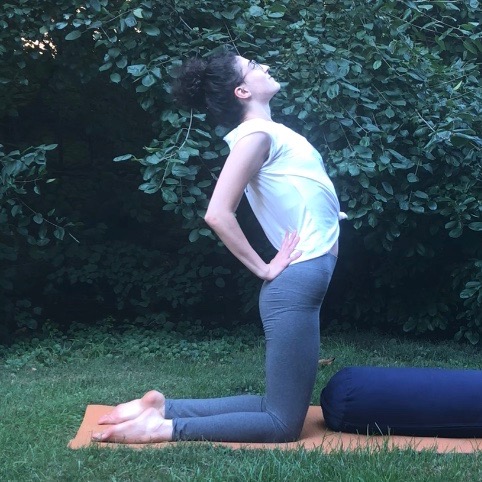
VARIATION: HANDS TO LOW BACK
Start by kneeling on your mat with your knees directly in line with your hips and the feet pointing straight back from your knees. Your legs should be in beautiful right angles. The toes can be curled under or you can point the toes and press the tops of the feet into the mat, whichever you prefer. Squeeze the inner thighs together. Feel your tailbone lengthen as you pull your abs in and up. Keep the core engaged as you begin to lift your heart. Feel the ribcage drifting away from the hips. Lean back. Think about pressing your hip bones forward so that they stay in line with your knees. You can practice in front of a wall and press the hips into the wall if you’d like. Bring the hands to your low back with the fingertips pointing up toward your shoulder blades or down toward your knees. If you’d like to go deeper, you can reach your hands all the way back toward your heels (traditional variation). Dip your chin, keeping the neck long. Gaze up toward the sky. Hold for ten deep breaths.
KEY POINTS TO REMEMBER
Hips over knees and feet behind the knees.
Keep your core engaged to protect lower back.
Squeeze the inner thighs.
Dip your chin - lengthen back of neck.
If you can’t breathe, you’ve gone too far.
Feel free to add a blanket under the knees/shins.

VARIATION: HANDS TO BLOCKS
This variation is very similar to the traditional variation, but adding blocks lessens the intensity.
Start by kneeling on your mat with your hips on your heels. The toes can be curled under or you can point the toes and press the tops of the feet into the mat, whichever you prefer. Place the blocks back by your feet. Press into your shin bones and lift up, bringing your hips in line with your knees. Squeeze the inner thighs together. Feel your tailbone lengthen as you pull your abs in and up. Keep the core engaged as you begin to lift your heart. Feel the ribcage drifting away from the hips. Lean back. Think about pressing your hip bones forward so that they stay in line with your knees. You can practice in front of a wall and press the hips into the wall if you’d like. Bring the hands to the blocks. Dip your chin, keeping the neck long. Gaze up toward the sky. Hold for ten deep breaths.
KEY POINTS TO REMEMBER
Hips over knees and feet behind the knees.
Keep your core engaged to protect lower back.
Squeeze the inner thighs.
Dip your chin - lengthen back of neck.
If you can’t breathe, you’ve gone too far.
Feel free to add a blanket under your knees/shins.


VARIATION: KNEELING WITH HIPS OVER HEELS
This variation can be practiced with or without props. You could also add a folded blanket under the knees for additional comfort.
To come into this variation, you’ll kneel on your mat with the hips over your heels. You can be seated on top of a bolster if you’d like. Root into your sit bones. Lengthen your tailbone and pull the low belly in. This will protect your low back. Lift your ribcage away from your hip bones and lean back. Open the chest. Reach back with fingertips to the floor or hands to blocks. Dip the chin and keep the back of the neck long. Hold for ten deep breaths.
KEY POINTS TO REMEMBER:
Root down through the sit bones
Engage the core to protect low back
Dip your chin to lengthen back of the neck

CHAIR VARIATION
Be seated at the edge of your chair with the feet flat on the floor and all ten toes pointing straight ahead. Ankles are directly below the knees. Root the sit bones into your chair. Lengthen the tailbone as you pull the abs in. Lift the chest and lean back. Open your heart. Gently dip the chin to keep the back of the neck long. Reach the hands behind you and hold onto the edges of the seat or reach the fingertips on top of the seat behind you. Hold for ten deep breaths.
HOW DID IT GO?
If you tried any of these variations, I'd love to know how it went for you! Tag me on Instagram and use the hashtag #spoonieyogatribe in your photos for a chance to be featured on my page! Or post a photo in our private Facebook group to show off your progress! As a part of your membership, you can get personalized feedback on your poses.